
Today, I’ll show you how to prep walls before painting them!
Y’all! The other day, I noticed a small dent in my wall that had been bothering me for weeks. Now, I don’t know about you, but that kind of thing just drives me crazy. I knew it was time to roll up my sleeves and get to work, but where to start? Prepping your walls before painting can be easy to overlook or skip altogether, but fear not! I’m here to share all of my tips and tricks for getting your walls in tip-top shape before you even think about cracking open that paint can. So, grab your overalls and your DIY hat, because we’ve got some work to do!
How to Prep Your Walls for Painting Step-by-Step
To get a professional look, you need to know how to prep your walls before you start painting. If you’re like me, tempted to just crack open a can of paint and start painting, then this is for you!
Step 1: Remove electrical plate covers
Before you start painting, be sure to remove any electrical plate covers. This will make it easier to paint around outlets and light switches.
Step 2: Clean the Surface
First things first, you need to clean the wall surface. Use a soft cloth or sponge and a gentle cleaner to wipe down the wall surface. Make sure to remove any dirt, dust, or grease.
Step 3: Repair any damage
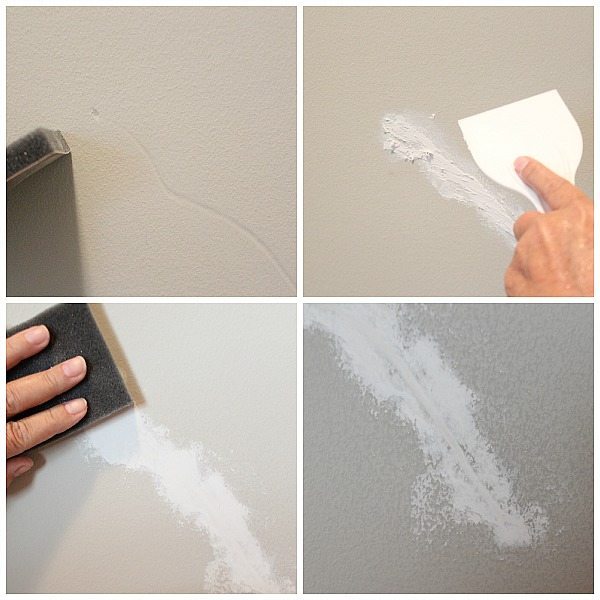
Next, it’s time to repair any holes, cracks, or dents in the wall. Use spackling paste or joint compound to patch up any damage. Be sure to sand down any rough edges to make the surface smooth.
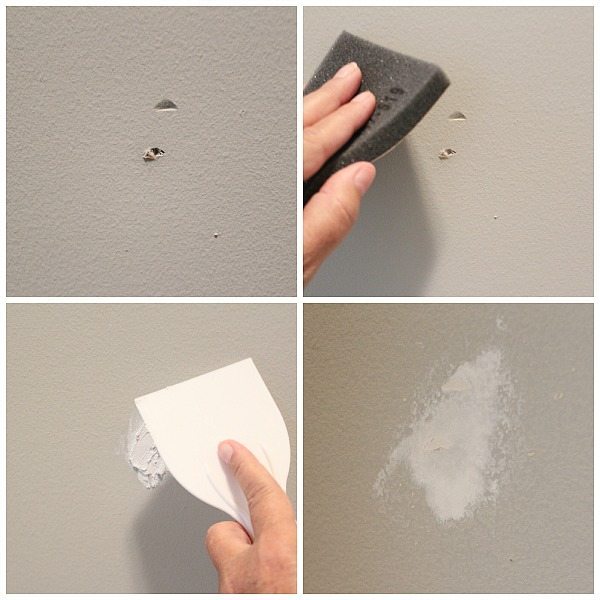
I don’t know what happened, but I cannot stop looking at it. And, just a little to the right of the hole there’s this…a long annoying dent! They’re like pimples on my face, I know they are there, I can’t stop thinking about them and they just irritate me.
For my project, as you can see, there was no way that simply painting them would have fixed that level of damage. I used a lightweight spackling with primer and it dries fast (like within 30 minutes)!
If the hole is deep, you might need to apply several coats of spackling, let it dry and sand in between. Use a repair kit if the damage is wide.
Step 4: Sand the wall
Once the repairs are complete, it’s time to sand the entire wall surface with a fine-grit sandpaper. This will create a slightly rough surface that will allow the paint to adhere better. Be sure to wipe down the wall with a clean cloth to remove any dust.
Step 5: Protect surrounding areas
Before you start painting, it’s important to protect any surrounding areas. Cover any furniture or flooring with drop cloths or plastic sheeting to prevent paint drips and splatters from ruining your belongings. (Sometimes I get a little too confident and start painting without doing this step - never a good idea!)
Step 6: Apply painter’s tape
Use painter’s tape to mask off any areas you don’t want to paint, such as trim, windows, or door frames. Be sure to press the tape down firmly to prevent paint from seeping underneath.
Step 7: Remove fuzz from your roller
Roll your paint roller over a piece of sticky tape or a lint roller to remove any fuzz or debris before using it to apply paint.
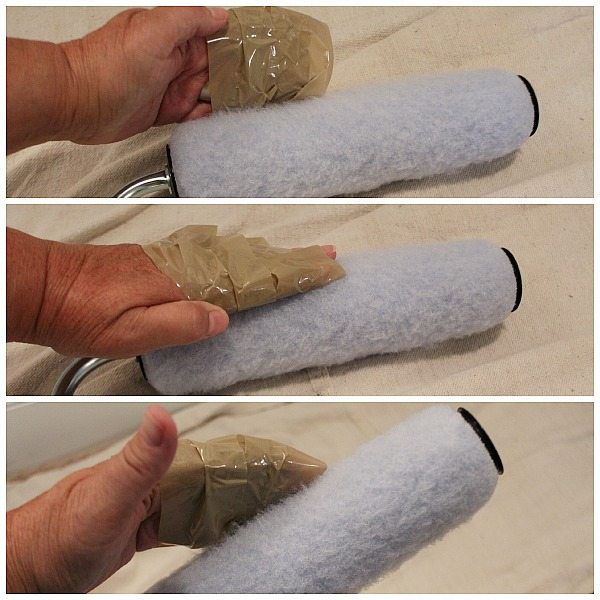
Rollers can be fuzzy, walls don’t need to be fuzzy. Wrap tape around your hand, sticky side out ;) and go over your roller removing the fuzz.
Now You’re Ready to Paint
Start by priming the wall
Be sure to stir your primer very well, all the good stuff settles on the bottom!
Apply a coat of primer to the entire wall surface, using a roller or brush. This will help the paint adhere better and provide a more even finish.
Next, Paint the wall
Once the primer has dried, it’s time to paint the wall. Again, be sure to stir your paint very well. Use a roller or brush to apply a coat of paint to the wall. Be sure to use long, even strokes and apply the paint in thin layers, allowing each layer to dry completely before applying the next.
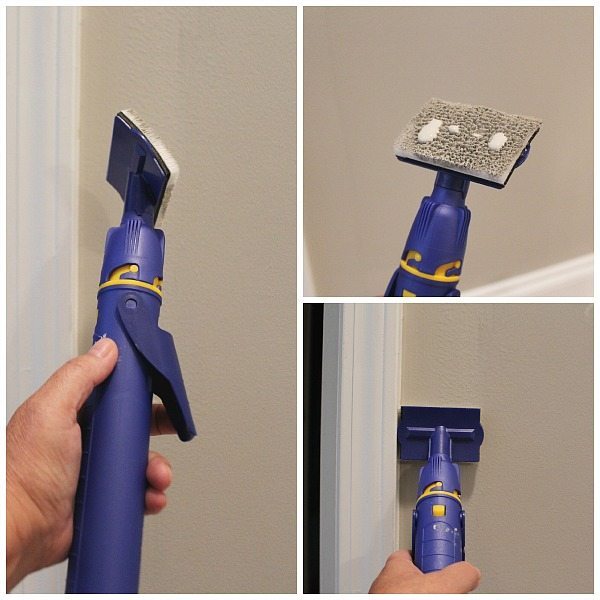
I used my HomeRight QuickPainter Pad Edge Painter, you just draw the paint up from the can. This little guy makes edging easy with less mess! Just pump to add more paint to the pad.
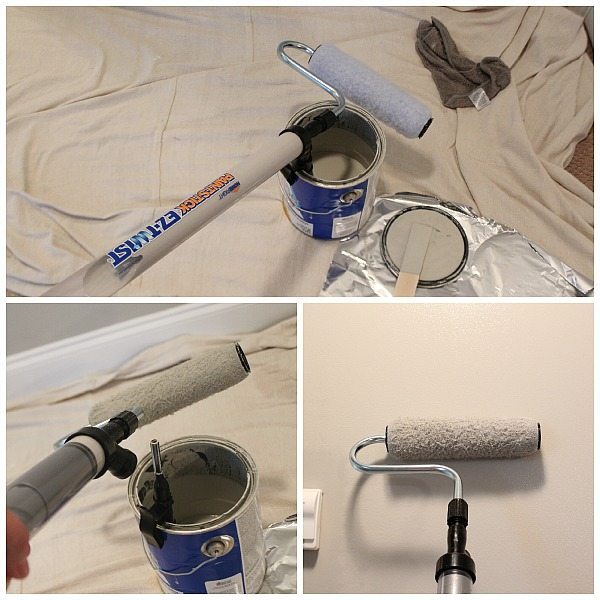
And for the wall, I used the EZ Twist Paintstick, I painted without a roller pan. Can you imagine how nice that was! Let me tell you, it was awesome!
You may also notice that bath cloth laying there. No, I didn’t bathe in it ;) I alway keep a wet/damp cloth handy for wiping off any little mistakes that I make. Because unlike Bob Ross, they are not happy little accidents. Some people use baby wipes. In case you’re wondering. I did not want to change my wall color, I just wanted to repair it.
This is the area at the top of the stairs. I didn’t have the original can of paint. I painted one whole wall, from edge to edge, I didn’t want to risk the paint not matching. Luckily, we had this paint left over from the basement project. It’s Sherwin Williams Mindful Gray. One of my favorite colors, right now anyway.
Repeat as necessary
Depending on the color and type of paint, you may need to apply a second or third coat to achieve the desired coverage and finish.
And finally, clean up!
Once the paint has dried completely, it’s time to clean up. Before you remove the painter’s tape, be sure to use a putty knife of razor blade to cut along the edge of the tape. This prevents the paint from being pulled up with the tape and from cracking along the paint line. Pick up your drop cloths and clean up any spills or drips. Store any leftover paint in a cool, dry place for future touch-ups.
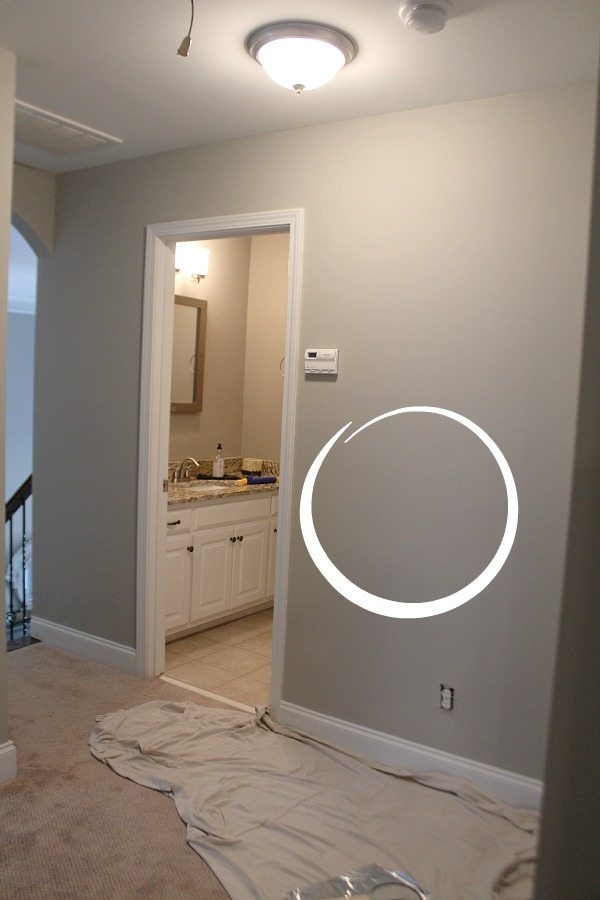
As you can see, the wall looks great! Inside the white circle is where the pimple, I mean damage was.

Right there! Now I guess I’m going to have to find another blemish to stare at every day.
How to Prep Your Walls Step-by-Step Summary
- Remove electrical plate covers
- Clean the surface
- Repair any damage
- Sand the wall
- Protect the surrounding areas
- Apply painter’s tape
- Remove fuzz from your roller
- Prime the wall (and let dry)
- Paint the wall
- Repeat as necessary
- Clean up
If you like painting, then you’ll love these projects!
How to paint kitchen cabinets:
Paint your dining chairs in one afternoon:
Paint to coordinate your baskets:
More fun DIY projects: Get Busy with your projects!
Thanks for stopping by!
It’s costs no more for you and it helps support my love of sharing free stuff on my blog :) My affiliate links: HomeRight C800755 EZ Twist Paint Stick


48 Comments
ArchiveI have plenty of walls that need painting. I have found painting is the best way to change the overall appearance of a room and refresh it without breaking the bank !!
I totally agree!
Using tape to remove the fuzz from your roller...genius! Your chairs look amazing!!
Great tips Debbie. I'll have to start de-linting my roller first. I like that one!!
Looks great now!!
Thanks!!
I have been painting my mom's home and the going up and down the ladder reloading my roller and edger, whick is very tiresome, I wish I had known about this product. Getting ready to help son paint three rooms, you can believe I am getting the Quick Painter edger to speed things along. Thanks for the introdction to this product.
yes i have many walls to paint because i have alot of stains, writing on walls and just some old paint that needs get off the wall
I did all e the above before I painted the hallway and dining room EXCEPT taking the fuzz off the roller--I used a small sponge roller. Looks great!
I always have a wall that needs painting touch ups with two kids, scuffs, dings, and marks are expected. These cool tools would make the job just that much easier!
I have lots of walls that look like yours with dents and dings. Winning this would helps so much in getting everything spruced up....after I do the prep on the walls.
Great tips!
Thanks for the tips and happy I found your blog. I was needing some new ones to follow!
Love your dining room chairs..I have a bedroom that needs a complete overhaul..Painting walls, painting the bathroom vanity, new bedding and window treatments. Just need to get started..
Great tips as I am about to embark on a wall painting frenzy. All the walls in this rental were painted a horrible caramel brown and it looks awful! Thanks for the great tips!!
I recently decided to repaint all the walls and I'm dreading it... Although these tools, especially the edger, might make it a little more desirable!
We've lived in our house for 16 years and we still have the original paint in our hallways. I'd love to try these Homeright products. Painting would be so much easier. Thanks for the chance to win this great prize!
I am in the process of repainting most of my house, I really need this! lol Thanks for the nice giveaway.
I need to repair and paint my walls. This giveaways would get me started!!!
I need to repaint my entire house!!! These tools would make it so much easier!
These are great tips, Debbie. Pinned to one of my big boards for the world to see. :)
Oh boy do I have walls that need to be painted! I just bought a house that has been used as a rental, for 12 years!! I need all of the help I can get, LOL. Thanks so much for the giveaway. :)
I wish I didn't have walls that needed to be painted but I do. Our master bedroom of all places, has never been (re)painted. My hubby and I bought our house as a bank owned foreclosure and we are living with contractor grade boring creamy beige. They did such a terrible job too- the corners are cracking and there are point drips everywhere! Ugh. One day we'll get around to it. I hope!
All the walls in my house need to be painted. I'm focusing on the ceiling this summer and the bathroom walls at the end of summer, fingers crossed!
I have 3 rooms to paint so this would be nice to have...TY
Yes, my living room walls could use a new paint job.
Great tips! I've been wanting to try this system for ages!!!
Yes! My son's bedroom, between the crayon and marker drawings..I'd love to repaint the whole room to a new fresh blue. And then I would love to paint my living room to a beautiful soft gray!
I have several walls that need to be repainted.
My damaged wall needs painting, but it's textured, kind of like orange peel & I'm wondering if after I spakle & sand, the patch will be visible under the paint because of the sanded spot (with texture removed)?
Yes, if the texture is removed it will be visible. If you use a flat paint and add back the look texture look it will be less visible. Lowe's and HomeDepot sell a product to add texture. Just ask someone in the paint department. You want to apply it in a manner to look like the texture you already have.
Found this just in time! I'm painting two rooms in September!
Yes! Every wall in my home needs a fresh coat of paint! I was so relieved when I read your statement that there are unfinished projects in 90% of your home! I thought we were the only ones! ;) Thanks for your tips & giveaways!!!
Great tips! I want to paint the master bathroom and the laundry room.
Thank you for the tips. I have never seen the tools you used. I think I need to invest.
Great tips! Can I ask what's the paint color you used?!
Thanks!
It's listed up there in the blog post :) it's Sherwin Williams Mindful Gray.
do you use the edger to make painting the baseboard and ceiling section faster or still do that by hand?
You can use the edger for painting next to the ceiling and baseboards. Just make sure you watch the edge guide and don't overload your paint. Just like painting with a brush you have to watch your alignment.
I hope this helps,
Debbie
thanks your advice helped me a lot
What color is the wall color
Hi Laura, the wall color is Sherwin Williams Comfort Gray. I love it!
Will you PLEASE come to Australia and paint my house for me PLEEEEASE!!!!
Love your work
I love your blog. Will you come to Australia to paint my house for me PLEEEASE?
I have a wall in my kitchen that I have to paint but it has paint peeling like a bad sunburn.. What do I do to remove this layer of paint and prpare the wall for painting..Do I spray a paint remover? I am so desperate, please answer ASAP this kitchen reno nightmare is almost over..
First you need to test your paint for lead. You can get a kit at most hardware stores. It will need to be sanded before you paint, be sure to wear a proper respirator!! After you've sanded, you may need to use drywall mud to smooth the surface. Use a good primer and you're ready to paint.
Hello. I think your ideas are great and managable. I want to paint my hallway and landing. I have lining paper on the walls and some of it has not lined up properly. Can i use the same treatment you described for the dings in the wall
I am so happy that the paint stick works for someone. I have purchased two of these (the first one leaked like a sieve), returned and bought a new one because I thought the first was faulty. The second one did the same. How do you get these products to work? I love the concept but clearly I am doing something wrong. :-/
Hi Julie, Would it be ok if I forward this to Homeright? I know someone there can help.
Thanks,
Debbie